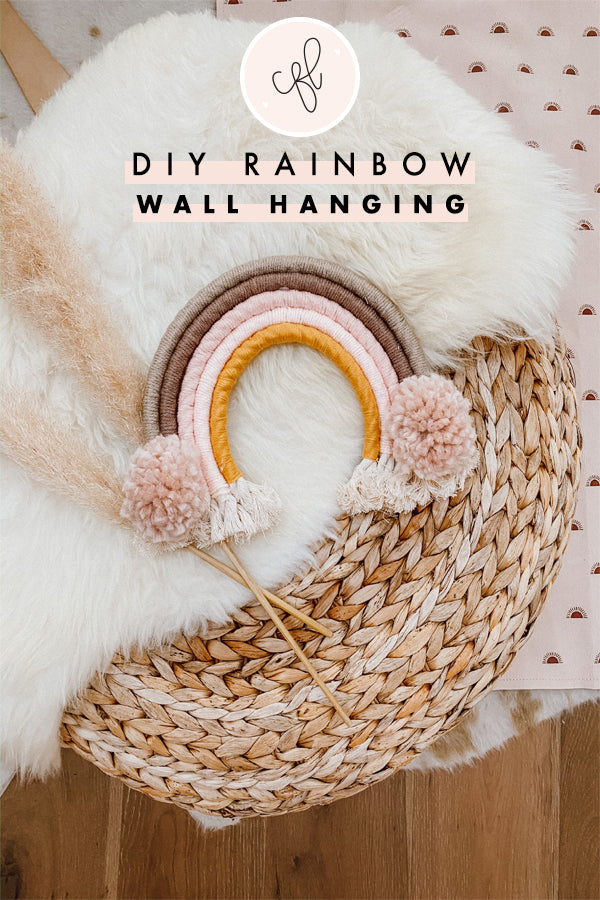
Do you ever see something on Pinterest or Etsy and think, "I can totally make that"? These fiber art Rainbows are trending lately, particularly in children's rooms and nurseries, and I'm obsessed! I had to try my hand at it, and while it's not perfect, I'm really happy with out it turned out and think it will be so cute in Emmie's room!
There are several super talented makers on Etsy that sell these, so if you're not a DIY kind of gal, go support a small shop and purchase one of theirs! But if you're feeling crafty, try it out using our tutorial and see what you come up with! It's so fun and totally customizable. You can do big or small, poms or no poms, thin yarn or chunky yarn, bold colors or a muted palette - the possibilities are endless!
All the supplies can be found at Hobby Lobby. To make a rainbow wall hanging, here’s what you’ll need:
- A variety of yarn – you can use different textures and colors. I used five different colors from the Yarn Bee brand (if you choose to make poms, you may need additional yarn; I used a softer, chunkier yarn for my poms)
- Cotton rope – found in the leather aisle
- 20 gauge craft wire – found in the jewelry making aisle
- Masking tape
- Pom maker
Then, just follow the graphic and instructions below, step by step:

- Step 1 – Lay your cotton rope in a rainbow shape, then with masking tape, wrap where each end will be.
- Step 2 – Cut the rope ends.
- Step 3 – Cut a piece of wire the length of each piece of rope, and attach the wire to the rope with tape (this holds the ropes in a rainbow shape).
- Step 4 – Start wrapping your rope with yarn; be sure to wind it tight, without overlapping.
- Step 5 – Tie a knot with the yarn at the beginning and end of your rope piece.
- Step 6 – It may not be perfect, so trim it up however you like, and you can add poms to cover up your mistake.
- Step 7-9 – Make poms using the pom maker. Instructions can be found in the package. I also have a highlight on Instagram stories where I walk you through it step by step! The highlight is called Pom Craft
- Step 10 – To connect all of the rope pieces together, create a “back” with hot glue. Put a dot at each end and middle of each rope piece to glue them together. You can tie the poms to whichever rope piece you want (I tied mine to the outermost rope piece)
This would be such a fun craft for a nursery. Or you could even gather your best girls for a Galentine party and make them together! Be sure to share a photo of yours and tag @chalkfulloflove! Happy crafting!