
You guys. I know I am almost late to the game these days because I start decorating for Christmas after Thanksgiving, but we had the most wonderful weekend of decorating out home and hunting for our game room Christmas tree! My oldest is 4 this year and he's so into helping us decorate and really experiencing all the magic there is about this time of year.
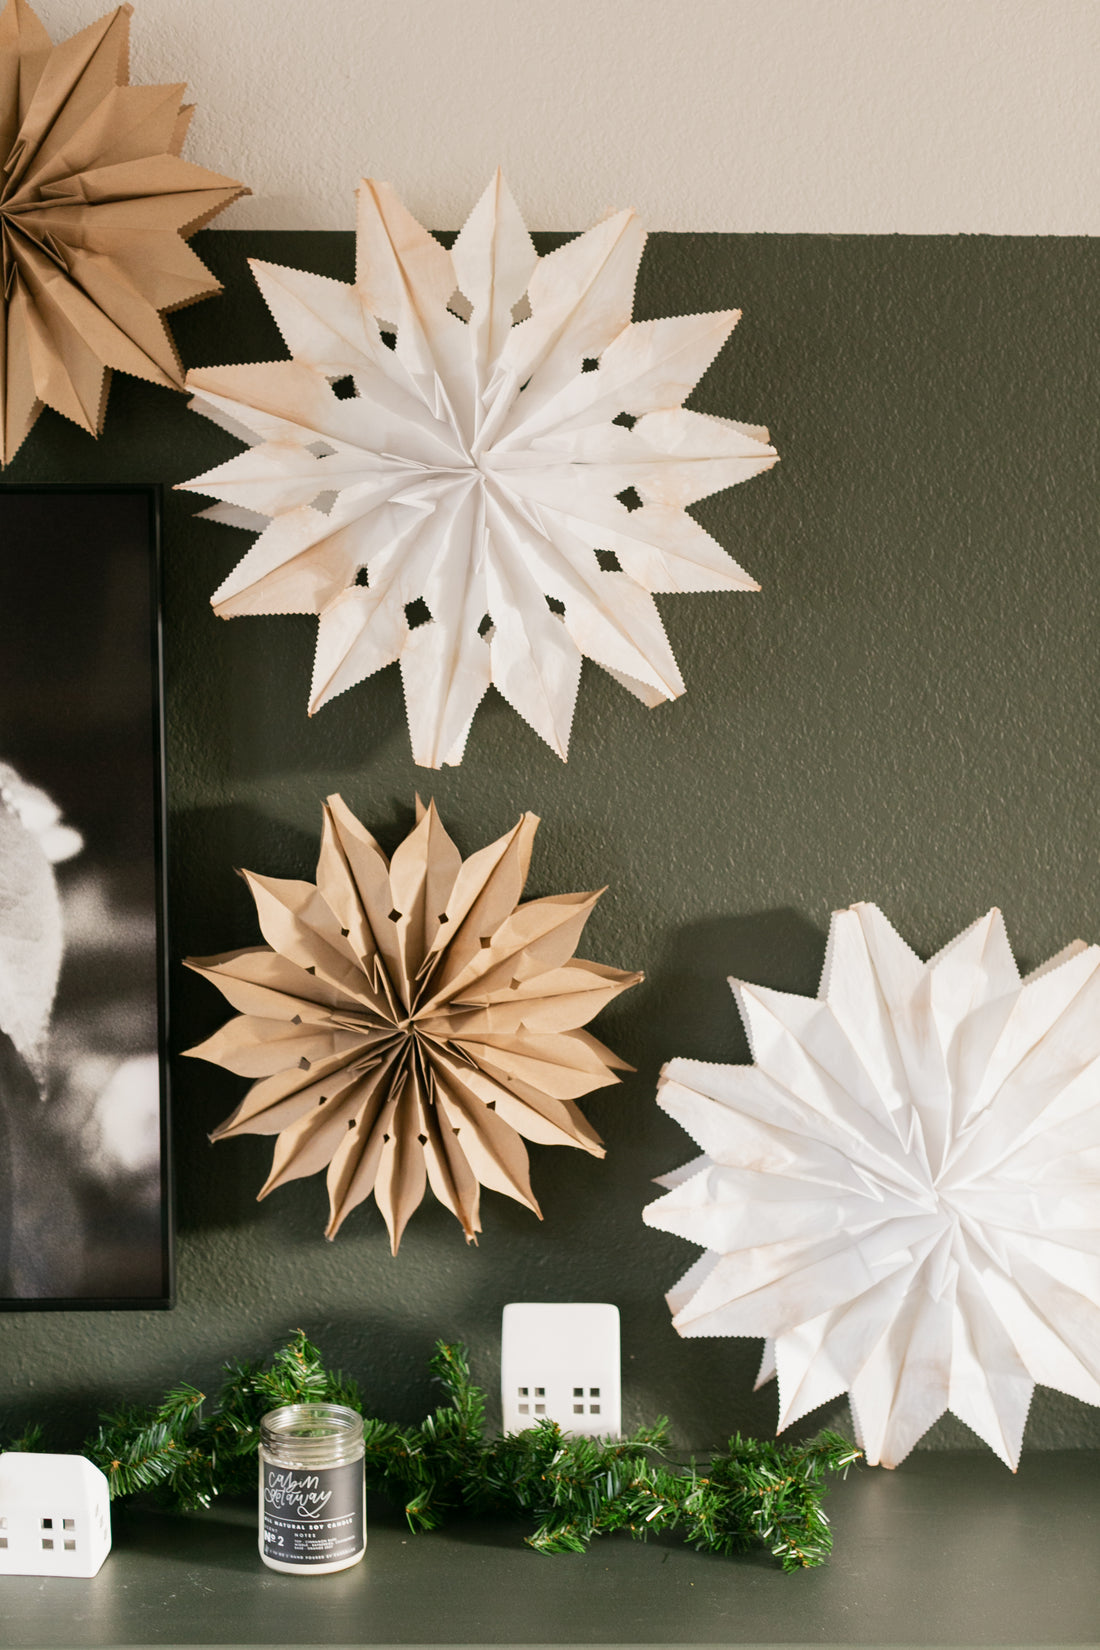
I wanted to make the game room extra special this year since it's where we do a lot of our hanging out as a family. Our TV wall is kind of the focal point, so I knew I wanted to do a fun installation around the TV. I've seen these paper bag snowflakes circling the internet, so I decided to give it a shot and also add a fun twist.
When I tell you I really didn't know how these would turn out, I'm not joking. I had seen some tutorials but was still a little confused as to how a group of paper bags would become a snowflake. I was pleasantly surprised to find that these are super simple and it does, in fact, turn into a snowflake. I decided to use two different colors and sizes of paper bags. I used the regular-sized white paper bags and small brown paper bags. I also made the decision to dye the ends of the white paper bags to make them unique and add a little something.
I'm so so happy with how these turned out and I'm for sure going to be keeping this up through January. The boys love it and it adds such a statement to the room. I can see these hanging in front of a window or over a doorway - there are so many options here!
You can find all of the materials and steps below as well as a little video that's a great visual tool! I cannot wait to see what you create!
MATERIALS:
- Regular-sized white paper bags - you will use 7 per snowflake (so I used 35 white bags)
- Small brown paper bags
- Liquid dye (I used this kind)
- Medium-sized pot
- Hot water
- Scissors
- Pattern Scissors (optional but it adds a fun flair!)
- Hot glue gun
- Hot glue sticks
- Tumb tacks for hanging
STEPS:
- Pour hot water (140°F or so) into a pot. Mix in your liquid dye. I used about 3 tablespoons of my dye, but if you would like for it to be darker, use more.
- Take your white paper bags and dip the tops of the bags in the water/dye mixture. Let them sit for about 5-10 minutes. If you would like them to be darker, let them sit a bit longer.
- Take your bags out of the dye and lay them out in a single layer to dry. I let mine dry overnight, but if you would like to speed up the process, you can use a hair dryer or fan.
- Once your bags are dry, gather them into groups of 7 (you will use 7 bags for each snowflake). With your scissors (or pattern scissors if using), cut the corners off the top of the bags to create a point. You can also add some extra designs but cutting circles, squares, etc. into the side or body of the bags.
- Using your hot glue gun, squeeze some glue down the middle of the bag from the top to the bottom. Stack the next bag directly on top and add glue to that bag from top to bottom. Stack the next bag on top. Continue this process until you have stacked all the bags on top of each other.
- Grab the top of the top back with your right hand and the top of the bottom back with your left and pull them toward each other until they meet (it should create a snowflake at this point!). Using your glue gun, glue the top and bottom bags together.
- Use steps 4-6 for the remainder of the white bags and the brown bags. Once you have your desired amount of snowflakes, use thumbtacks to fasten them to the wall and voila! you have a lovely snowflake installation!


